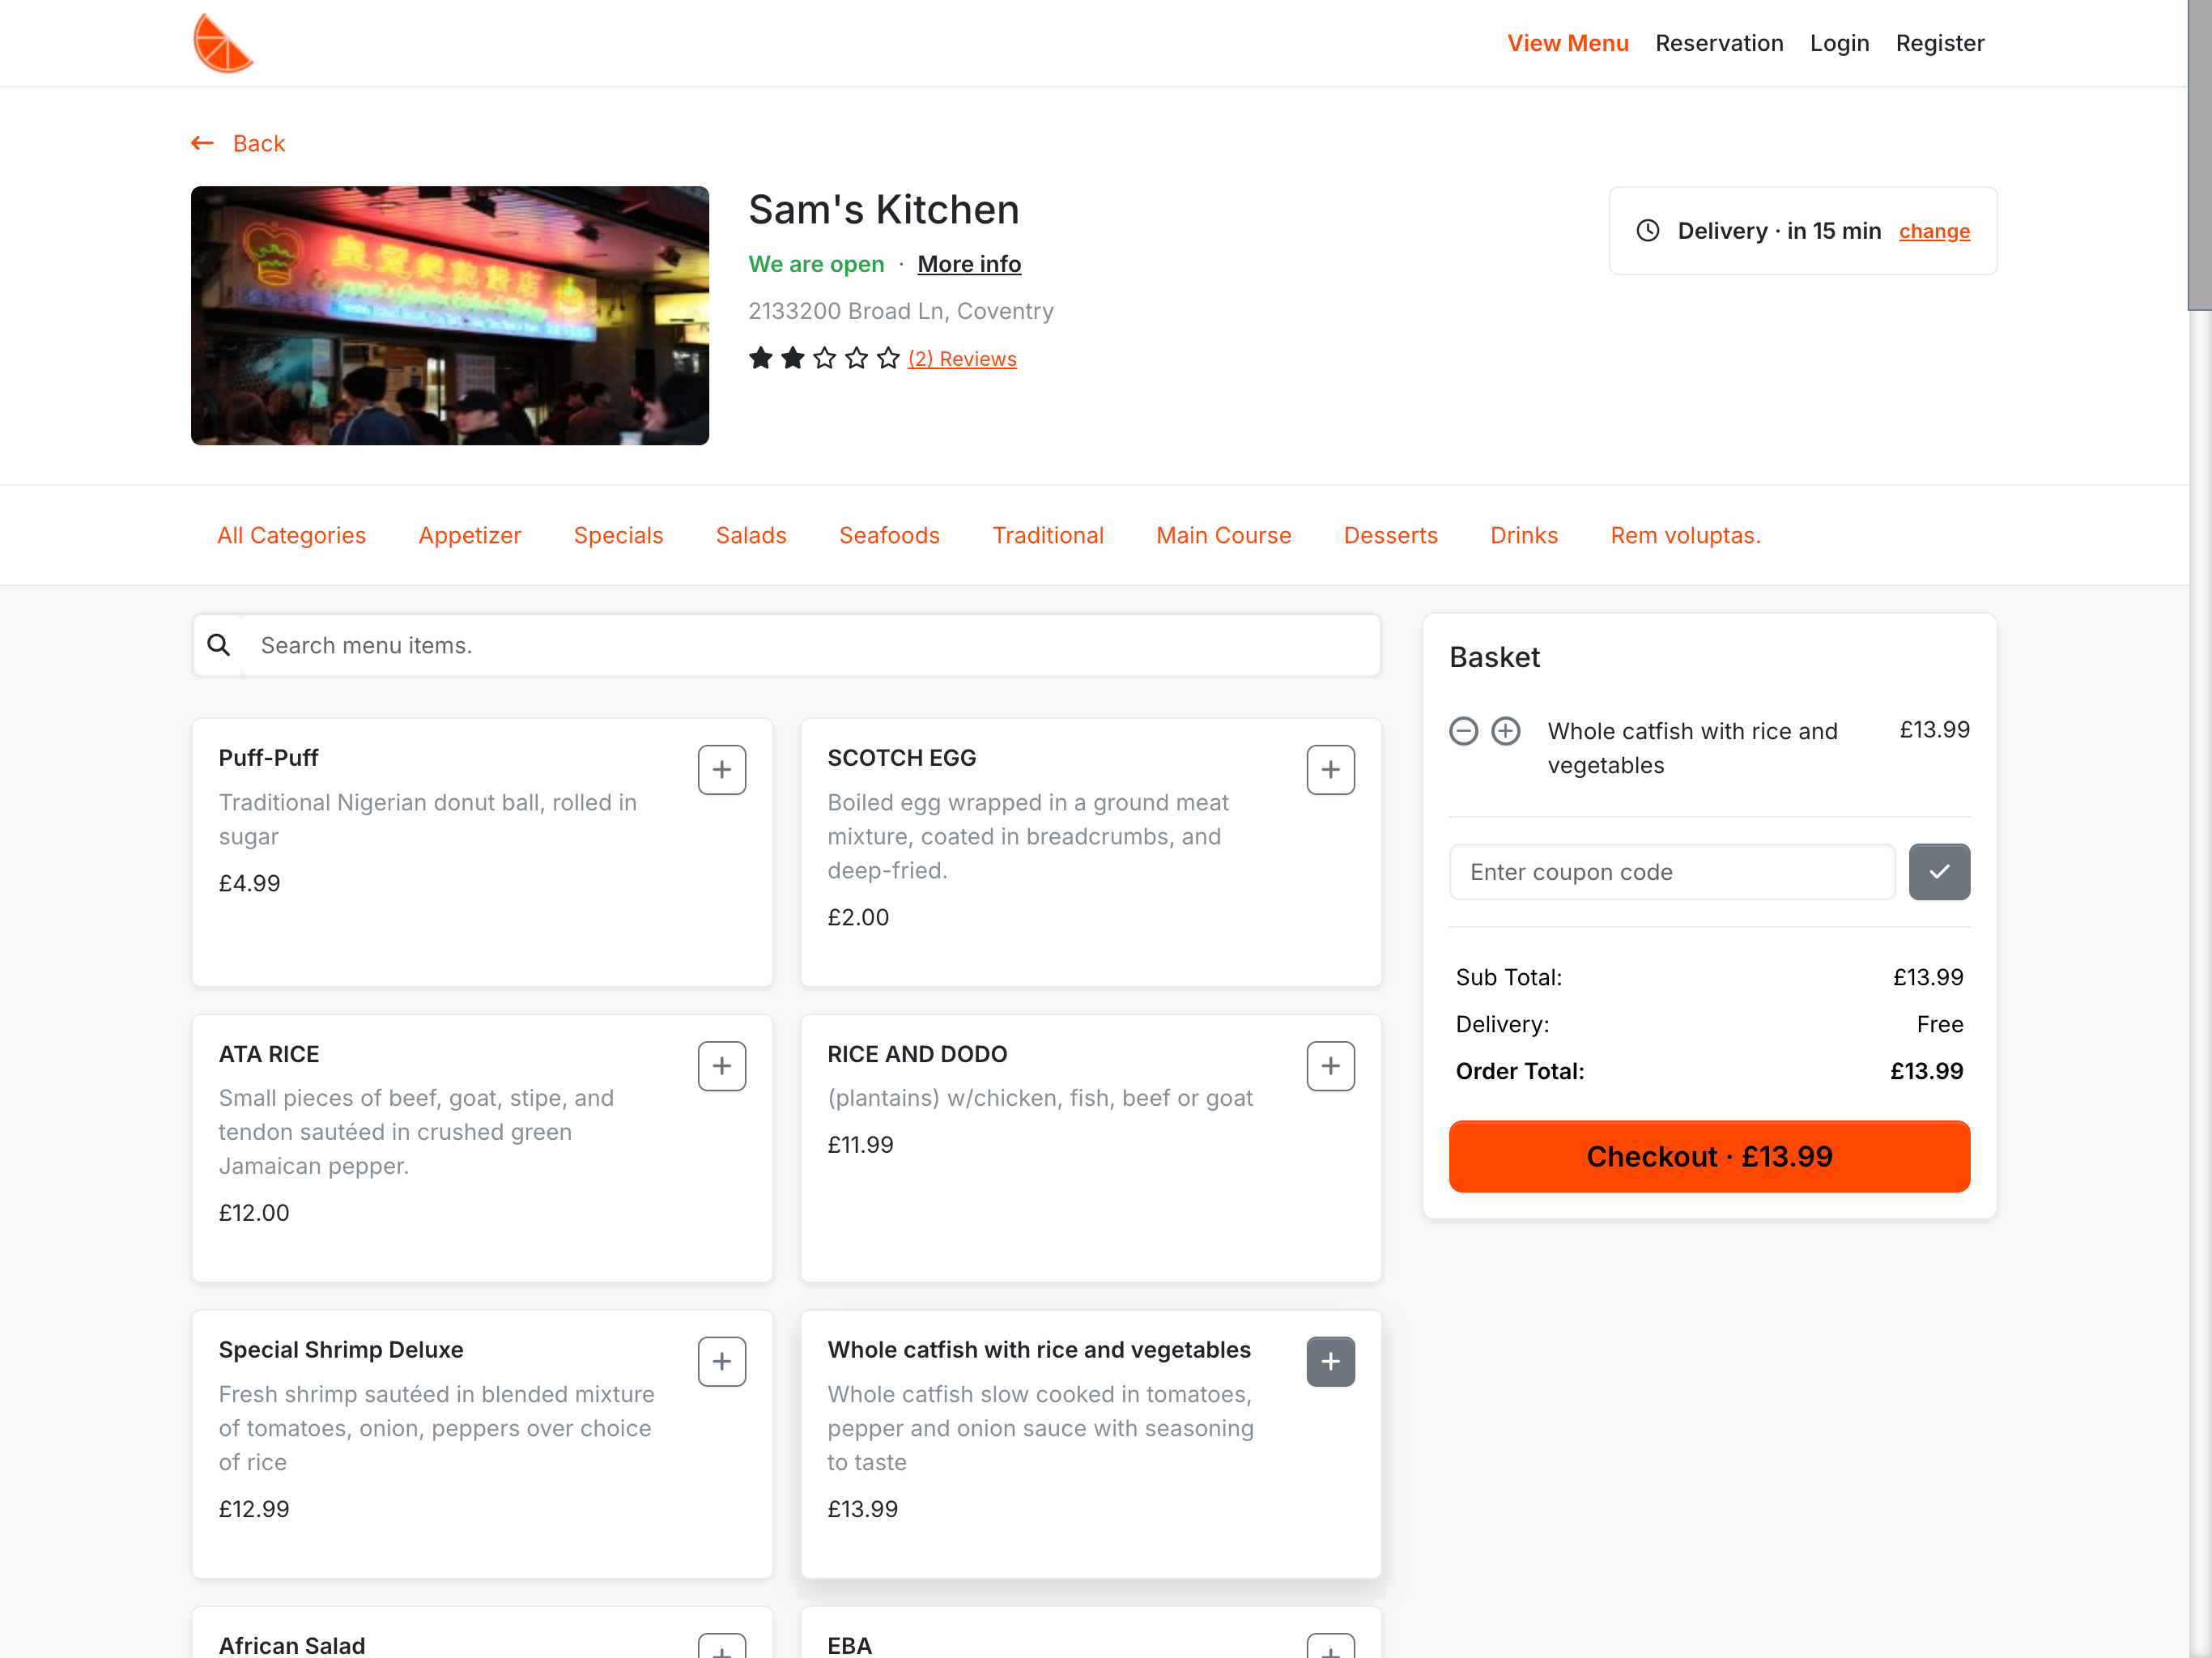
Easily add a shopping cart to your site. The most powerful way to sell your menu items.
The TastyIgniter Cart extension provides a straightforward and adaptable shopping cart solution.
You can install the extension via composer using the following command:
composer require tastyigniter/ti-ext-cart:"^4.0" -W
Run the database migrations to create the required tables:
php artisan igniter:up
You can configure the Cart extension by navigating to Manage > Settings > Cart settings. The settings available are:
You can configure the checkout settings for each location in the admin area. Navigate to the Restaurant > Settings > General admin page, and click the Checkout settings button. You can set the following checkout settings for each location:
You can configure the delivery and pickup order settings for each location in the admin area. Navigate to the Restaurant > Settings > General admin page, and click the Delivery settings or Pick-up settings button. You can set the following delivery or pickup settings for each location:
You can configure the order settings for all locations in the admin area. Navigate to the Manage > Settings > Order admin page. You can set the following order settings for all locations:
You can add items to the cart using the add
method on the Igniter\Cart\Facades\Cart
facade.
Here's an example of adding a single item to the cart using an array of item details:
use Igniter\Cart\Facades\Cart;
$quantity = 2;
$cartItem = Cart::add([
'id' => 1,
'name' => 'Cheeseburger',
'price' => 10.00,
'comment' => 'Extra ketchup',
], $quantity);
You can also add an item to the cart using the Igniter\Cart\Models\Menu
model. The model must implement the Igniter\Cart\Contracts\Buyable
interface.
use Igniter\Cart\Facades\Cart;
use Igniter\Cart\Models\Menu;
$menuItem = Menu::find(1);
Cart::add($menuItem, $quantity, $options, $comment);
If you have items with options, you can pass the options as an array:
$options = [
'id' => 1, // Option ID
'name' => 'Topping', // Option name
'type' => 'checkbox', // Option type (select, radio, checkbox, quantity)
'values' => [ // Selected option value
[
'id' => 1, // Option value ID
'qty' => 1, // Option value quantity
'price' => 1.00, // Option value price
'name' => 'Peperoni', // Option value name
],
[
'id' => 1, // Option value ID
'qty' => 1, // Option value quantity
'price' => 1.99, // Option value price
'name' => 'Sweetcorn', // Option value name
],
],
];
Cart::add($menuItem, $quantity, $options);
The add
method returns the CartItem
instance that was added to the cart.
You can also add multiple items to the cart using the addItems
method:
use Igniter\Cart\Facades\Cart;
$items = [
[
'id' => 1,
'name' => 'Cheeseburger',
'price' => 10.00,
],
[
'id' => 2,
'name' => 'Fries',
'price' => 5.00,
],
];
Cart::add($items);
Cart::add([$menuItem1, $menuItem2]);
You can update items in the cart using the update
method on the Cart
facade. The method accepts the cart item rowId
as the first parameter.
If you want to update the quantity of an item in the cart, you can pass the new quantity as the second parameter:
$rowId = '897162dd25db7f66e5fce4416b1884f3';
Cart::update($rowId, 4);
If you want to update the options of an item in the cart, you can pass the new options as the second parameter:
$rowId = '897162dd25db7f66e5fce4416b1884f3';
Cart::update($rowId, ['options' => $options]);
If you want to update the comment of an item in the cart, you can pass the new comment as the second parameter:
$rowId = '897162dd25db7f66e5fce4416b1884f3';
Cart::update($rowId, ['comment' => 'Extra ketchup']);
You can also pass the Igniter\Cart\Models\Menu
model instance as the second parameter to update the item in the cart:
use Igniter\Cart\Facades\Cart;
use Igniter\Cart\Models\Menu;
$rowId = '897162dd25db7f66e5fce4416b1884f3';
$menuItem = Menu::find(1);
Cart::update($rowId, $menuItem);
You can remove items from the cart using the remove
method on the Cart
facade. The method accepts the cart item rowId
as the first parameter:
use Igniter\Cart\Facades\Cart;
$rowId = '897162dd25db7f66e5fce4416b1884f3';
Cart::remove($rowId);
You can retrieve all items in the cart using the content
method on the Cart
facade:
use Igniter\Cart\Facades\Cart;
$cartItems = Cart::content();
You can retrieve a specific item in the cart using the get
method on the Cart
facade. The method accepts the cart item rowId
as the first parameter:
use Igniter\Cart\Facades\Cart;
$rowId = '897162dd25db7f66e5fce4416b1884f3';
$cartItem = Cart::get($rowId);
You can destroy the cart using the destroy
method on the Cart
facade:
use Igniter\Cart\Facades\Cart;
Cart::destroy();
You can retrieve the total of all items in the cart minus any conditions using the subtotal
method on the Cart
facade:
use Igniter\Cart\Facades\Cart;
$subtotal = Cart::subtotal();
You can retrieve the total of all items in the cart including any conditions using the total
method on the Cart
facade:
use Igniter\Cart\Facades\Cart;
$total = Cart::total();
You can retrieve all applied conditions on the cart using the conditions
method on the Cart
facade:
use Igniter\Cart\Facades\Cart;
$conditions = Cart::conditions();
You can create multiple cart instances using the instance
method on the Cart
facade. The method accepts the cart instance name as the first parameter:
use Igniter\Cart\Facades\Cart;
Cart::instance('wishlist')->add($menuItem, 1);
// Retrieve the wishlist items
$wishlistItems = Cart::instance('wishlist')->content();
You can store the content and conditions of a cart instance using the store
method on the Cart
facade. The method accepts the cart instance name as the first parameter:
use Igniter\Cart\Facades\Cart;
Cart::store('wishlist');
You can restore the content and conditions of a cart instance using the restore
method on the Cart
facade. The method accepts the cart instance name as the first parameter:
use Igniter\Cart\Facades\Cart;
Cart::restore('wishlist');
You can delete the stored content and conditions of a cart instance using the deleteStored
method on the Cart
facade. The method accepts the cart instance name as the first parameter:
use Igniter\Cart\Facades\Cart;
Cart::deleteStored('wishlist');
You can create an order from the cart using the Igniter\Cart\Classes\OrderManager
class. The class provides methods to create an order from the cart and process the payment.
use Igniter\Cart\Classes\OrderManager;
use Igniter\Local\Facades\Location;
use Igniter\Local\Models\Location as LocationModel;
$orderManager = resolve(OrderManager::class);
// Create a new order model instance, or retrieve an existing
// order model instance if there is an order ID in the session
$order = $orderManager->loadOrder();
// Update location order type using the Location facade
Location::updateOrderType(LocationModel::COLLECTION);
// Update location schedule time slot to be used as order time
Location::updateScheduleTimeSlot($dateTime, $isAsap);
// Save the order attributes, order menu items, and order totals to the database
$orderManager->saveOrder($order, $attributes);
The saveOrder
method saves the order attributes, order menu items, and order totals to the database.
The $attributes
array may contain the following keys:
first_name
: (string) The customer's first name.last_name
: (string) The customer's last name.email
: (string) The customer's email address. This is field is only required if the customer is a guest.telephone
: (string) The customer's telephone number.address_id
: (integer) The customer's address ID. This field is only required for delivery orders.address_1
: (string) The customer's address line 1.address_2
: (string) The customer's address line 2.city
: (string) The customer's city.state
: (string) The customer's state.postcode
: (string) The customer's postcode.country_id
: (integer) The customer's country ID.comment
: (string) The order comment.delivery_comment
: (string) The order delivery comment.You can generate schedule time slots for a location using the scheduleTimeslot
method on the Location
facade. The method accepts the $orderType
parameter and returns a collection of timeslots where the key is the date string and value is an array of timeslots.
$orderType = Location::COLLECTION;
$timeslots = Location::scheduleTimeslot($orderType);
For more information on generating schedule time slots, see the Local Extension documentation.
Once the order has been created, you can process the payment for the order using the processPayment
method on the Igniter\Cart\Classes\OrderManager
class. The method accepts the order model instance and an array of order attributes as parameters.
$orderManager->processPayment($order, $attributes);
For more information on processing payments, see the PayRegister Extension documentation.
After creating an order and processing the payment, you can complete the checkout process by updating the order status, marking the order as paid and sending the order confirmation email to the customer.
$order->updateOrderStatus($statusId);
$order->markAsPaymentProcessed();
$order->mailSend('igniter.cart::mail.order', 'customer');
You can update the order status using the updateOrderStatus
method on the order model instance. The method accepts the order status ID or status model instance as the first parameter.
$order->updateOrderStatus($statusId);
You can assign staff members to an order using the assignTo
method on the order model instance. The method accepts an instance of the Igniter\User\Models\UserGroup
model as the first parameter and the Igniter\User\Models\User
model as the second parameter.
use Igniter\User\Models\User;
use Igniter\User\Models\UserGroup;
$staff = User::find(1);
$group = UserGroup::find(1);
$order->updateAssignTo($group, $staff);
You can cancel an order using the markAsCanceled
method on the order model instance. The method updates the order status to canceled order status configured in the admin area. The method accepts the $statusData
array as the first parameter.
$order->markAsCanceled($statusData);
The $statusData
array may contain the following keys:
staff_id
: The staff ID who canceled the order.comment
: The reason for canceling the order.notify
: Whether to notify the customer of the order cancellation.The Cart extension fires the following events during the checkout process:
Event | Description | Parameters |
---|---|---|
igniter.checkout.beforeSaveOrder |
Before an order is saved. | The Order model instance and $data form request |
igniter.checkout.afterSaveOrder |
After an order is saved. | The Order model instance |
igniter.checkout.beforePayment |
Before processing the payment for an order. | The Order model instance and $data form request |
admin.order.beforePaymentProcessed |
Before an order is marked as payment processed. | The Order model instance |
admin.order.paymentProcessed |
After an order is marked as payment processed. | The Order model instance |
admin.order.canceled |
When an order is canceled. | The Order model instance |
admin.order.beforeRefundProcessed |
Before an order is marked as refunded. | The Order model instance |
admin.order.refundProcessed |
After an order is marked as refunded. | The Order model instance |
igniter.cart.beforeAddOrderStatus |
Before adding an order status. | The StatusHistory model instance, Order model instance, $statusId status ID and the $previousStatus previous status ID |
igniter.cart.orderStatusAdded |
After an order status is added. | The Order model instance and StatusHistory model instance |
igniter.cart.orderAssigned |
After an order is assigned to a staff member. | The Order model instance and User model instance |
Here is an example of hooking an event in the boot
method of an extension class:
use Illuminate\Support\Facades\Event;
public function boot()
{
Event::listen('igniter.checkout.beforeSaveOrder', function ($order, $data) {
// ...
});
}
Order types are defined as classes that extends the Igniter\Cart\Classes\AbstractOrderType
class and is typically stored in the src/OrderTypes
directory of your extension. Here's an example of a delivery order type:
namespace Author\Extension\OrderTypes;
use Igniter\Cart\Classes\AbstractOrderType;
class Delivery extends AbstractOrderType
{
public function getOpenDescription(): string
{
return 'Delivery in 15 mins';
}
public function getOpeningDescription(string $format): string
{
return 'Delivery starts in 10 mins';
}
public function getClosedDescription(): string
{
return 'Delivery is closed';
}
public function getDisabledDescription(): string
{
return 'Delivery is not available.';
}
public function isActive(): bool
{
return $this->code === 'delivery';
}
public function isDisabled(): bool
{
return false;
}
}
Once you have defined an order type class, you need to register the order types. Here's an example of registering a delivery order type:
public function registerOrderTypes(): array
{
return [
\Author\Extension\OrderTypes\Delivery::class => [
'code' => 'delivery',
'name' => 'Delivery',
]
];
}
Cart conditions are defined as classes that extends the Igniter\Cart\CartCondition
class and implements the apply
methods.
A cart condition class is typically stored in the src/CartConditions
directory of your extension. Here's an example of a cart condition that applies a tip to the cart total:
namespace Author\Extension\CartConditions;
use Igniter\Flame\Cart\CartCondition;
class Tip extends CartCondition
{
public function beforeApply(): bool
{
}
public function getActions(): array
{
}
}
The following methods are available to customize the cart condition:
beforeApply
: This method is called before the condition is applied to the cart. You can return false
to prevent the condition from being applied.afterApply
: This method is called after the condition is applied to the cart.getRules
: This method returns the rules that must be met for the condition to be applied.getActions
: This method returns the actions that will be applied to the cart. The actions can be percentage
, fixed
, or value
.whenValid
: This method is called when the condition is valid.whenInvalid
: This method is called when the condition is invalid.Once you have defined a cart condition class, you need to register the cart conditions. Here's an example of registering a tip condition:
public function registerCartConditions(): array
{
return [
\Author\Extension\CartConditions\Tip::class => [
'name' => 'tip',
'label' => 'Tip',
'description' => 'Applies tips to cart total',
]
];
}
Cart conditions are automatically applied to the cart, however, you may apply metadata to a condition using the loadCondition
method:
use Igniter\Cart\Facades\Cart;
$condition = Cart::getCondition('tip');
$condition->setMetaData($metaData);
Cart::loadCondition($condition);
And check if a condition is applied successfully to the cart using the isValid
method:
if (Cart::getCondition('tip')->isValid()) {
// Do something...
}
You can also clear the metadata on a condition using the removeCondition
method:
Cart::removeCondition('tip');
When setting up automation rules through the Admin Panel, you can use the following events registered by this extension:
An automation event class used to capture the admin.order.paymentProcessed
system event when an order payment is confirmed. The event class is also used to prepare the order parameters for automation rules. The following parameters are available:
order
: The Order
model instance.status
: The Status
model instance.order_number
: The order number.order_id
: The order ID.first_name
: The customer's first name.last_name
: The customer's last name.customer_name
: The customer's full name.email
: The customer's email address.telephone
: The customer's telephone number.order_comment
: The order comment.delivery_comment
: The order delivery comment.order_type
: The order type.order_time
: The order time.order_date
: The order date.order_added
: The order added date.invoice_id
: The generated invoice number.invoice_number
: The generated invoice number.invoice_date
: The date the invoice was generated.order_payment
: The order payment method code.order_menus
: An array of order menu items. Each item contains the following parameters:
menu_name
: The menu item name.menu_quantity
: The menu item quantity.menu_price
: The menu item price.menu_subtotal
: The menu item subtotal.menu_options
: A string of menu item options.menu_comment
: The menu item comment.order_totals
: An array of order totals. Each total contains the following parameters:
order_total_title
: The total title.order_total_value
: The total value.priority
: The total priority.order_address
: The order delivery address.location_logo
: The path to the location logo.location_name
: The location name.location_email
: The location email address.location_telephone
: The location telephone number.location_address
: The location address.status_name
: The order status name.status_comment
: The order status comment.order_view_url
: The order view URL.An automation event class used to capture the admin.order.statusUpdated
system event when an order status is updated. Similar to the Order Placed Event
, the event class is also used to prepare the order parameters for automation rules. The available parameters are the same as the Order Placed Event
.
An automation event class used to capture the admin.order.assigned
system event when an order is assigned to a staff member. Similar to the Order Placed Event
, the event class is also used to prepare the order parameters for automation rules. The available parameters are the same as the Order Placed Event
including the following additional parameters:
assignee
: The assignee Staff
model instance.When setting up automation rules through the Admin Panel, you can use the following automation conditions registered by this extension:
A condition class used to check if an order attribute match the specified value or rule. The following attributes are available:
first_name
: The customer's first name.last_name
: The customer's last name.email
: The customer's email address.location_id
: The location ID where the order was placed.A condition class used to check if an order status attribute match the specified value or rule. The following attributes are available:
status_id
: The order status ID.status_name
: The order status name.notify_customer
: Whether the customer was notified of the status change.The Stock Editor form widget is available for use in the Admin Panel. The widget allows you to manage stock levels for menu items and options.
To use the widget, add the following code to your form field definition file:
'my_field' => [
'label' => 'Stock Editor',
'type' => 'stockeditor',
],
The following options are available for the stockeditor
form widget type:
form
: This is either an array or path to the form definition file containing form configuration for the stock editor widget when managing stock levels and list definition file for the listing stock level history.The Cart extension registers the following mail templates, managed through the Admin Panel:
igniter.cart::mail.order
: Order confirmation email message sent to customers.igniter.cart::mail.order_alert
: New order notification email sent to administrators.igniter.cart::mail.order_update
: Order status update email sent to customers.igniter.cart::mail.low_stock_alert
: Low stock alert email sent to administrators.You can send any of the above mail templates using the mailSend
method on the SendsMailTemplate model trait attached to Igniter\Cart\Models\Order
model. For example, to send the order confirmation email to a customer:
use Igniter\Cart\Models\Order;
use Igniter\Cart\Models\Stock;
$order = Order::find(1);
// Second parameter is a string or array of recipient type: customer, location or admin
$order->mailSend('igniter.cart::mail.order', 'customer');
// Send low stock alert email
$stock = Stock::find(1);
$stock->mailSend('igniter.cart::mail.low_stock_alert', 'admin');
The Cart extension registers the following staff permissions:
Module.CartModule
: Control who can manage the cart settings in the admin area.Admin.Allergens
: Control who can manage menu allergens in the admin area.Admin.Categories
: Control who can manage menu categories in the admin area.Admin.Menus
: Control who can manage menu items in the admin area.Admin.Mealtimes
: Control who can manage mealtimes in the admin area.Admin.Orders
: Control who can manage orders in the admin area.Admin.DeleteOrders
: Control who can delete orders in the admin area.Admin.AssignOrders
: Control who can assign orders to other staff members in the admin area.For more on restricting access to the admin area, see the TastyIgniter Permissions documentation.
The Cart Library used with this extension will fire some global events that can be useful for interacting with the cart.
Event | Description | Parameters |
---|---|---|
cart.created |
When cart instance is created. | The Cart instance and CartItem instance |
cart.adding |
Before an item is added to the cart. | The Cart instance and CartItem instance |
cart.added |
When an item has been added to the cart. | The Cart instance and CartItem instance |
cart.updating |
Before an item is updated in the cart. | The Cart instance and CartItem instance |
cart.updated |
When an item has been updated in the cart. | The Cart instance and CartItem instance |
cart.removing |
Before an item is removed from the cart. | The Cart instance and CartItem instance |
cart.removed |
When an item has been removed from the cart. | The Cart instance and CartItem instance |
cart.clearing |
Before all items, conditions is cleared from the cart. | The Cart instance |
cart.cleared |
When all items and conditions has been cleared from the cart. | The Cart instance |
cart.stored |
When the content of a cart was stored. | The Cart instance |
cart.restored |
When the content of a cart was restored. | The Cart instance |
cart.content.clearing |
Before all items is cleared from the cart. | The Cart instance |
cart.content.cleared |
When all items has been cleared from the cart. | The Cart instance |
cart.condition.loading |
Before a condition is loaded to the cart. | The Cart instance and CartCondition instance |
cart.condition.loaded |
When a condition has been loaded to the cart. | The Cart instance and CartCondition instance |
cart.condition.removing |
Before a condition is removed from the cart. | The Cart instance and CartCondition instance |
cart.condition.removed |
When a condition has been removed from the cart. | The Cart instance and CartCondition instance |
cart.condition.clearing |
Before all conditions is cleared from the cart. | The Cart instance |
cart.condition.cleared |
When all conditions has been cleared from the cart. | The Cart instance |
Here is an example of how to listen for a cart event from your extension boot
method:
Event::listen('cart.updated', function($cart, $cartItem) {
// ...
});
Please see CHANGELOG for more information on what has changed recently.
If you encounter a bug in this extension, please report it using the Issue Tracker on GitHub.
Contributions are welcome! Please read TastyIgniter's contributing guide.
For reporting security vulnerabilities, please see our our security policy.
TastyIgniter Cart extension is open-source software licensed under the MIT license.
Minor improvements